利用观测云实现业务数据驱动的弹性扩缩容
云原生时代业务系统弹性扩容能力也在不断接受考验,能否自动、快速扩缩容直接影响业务,对弹性扩缩容的可观测至关重要,本文带你一起了解观测云是如何做的。

背景
在使用观测云对业务系统进行观测的过程中,除了可以实现业务系统的全面感知,我们还可以基于观测云数据处理开发平台 DataFlux Func ,结合故障模型对被测系统进行主动管理,例如弹性扩容或系统故障自愈,从而实现系统管理从观测到恢复的自动闭环。
本文以 K8s 环境部署的 ruoyi 系统为例,演示一个简单的业务系统自动扩容过程,设定的故障自愈场景是“当故障发生时,尝试扩容发生异常的容器”。
实施步骤
对于示例场景,需要在 DataFlux Func 平台执行如下两步操作:
- 首先,需要实现对 K8s 集群的访问和操作,获取对象应用容器当前的状态并执行扩容;
- 其次,要将该处理过程发布为 API 接口,由观测云中心触发调用操作。
配置 K8s 集群访问权限
以脚本方式实现对 K8s api-server 的方式主要有三种:
- HTTPS 证书认证:基于 CA 证书签名的数字证书认证
- HTTP Token 认证:通过一个 Token 来识别用户
- HTTP Base 认证:用户名+密码的方式认证
本例使用 HTTP Token 认证实现访问,配置过程如下:
Func 平台新建脚本
登录 DataFlux Func 平台,创建新脚本并安装 K8s 官方脚本包
pip3 install kubernetes
创建账号并获取 token
创建用户
kubectl create serviceaccount demo-admin -n kube-system
用户授权
kubectl create clusterrolebinding demo-admin --clusterrole=cluster-admin --serviceaccount=kube-system: demo-admin
获取用户 Token
kubectl describe secrets -n kube-system $(kubectl -n kube-system get secret | awk '/ demo-admin /{print $1}')
配置客户端连接
    configuration = client.Configuration()
    setattr(configuration, 'verify_ssl', False)
    client.Configuration.set_default(configuration)
    configuration.host = KUBE_API_HOSTS                    #ApiHost
    configuration.verify_ssl = False
    configuration.debug = True
    configuration.api_key = {"authorization": "Bearer " + API_TOKEN}
    client.Configuration.set_default(configuration)
这样就做好了集群访问准备。
(官方库的说明可参考链接:https://github.com/kubernetes-client/python)
编写扩容处理脚本
当故障发生时,我们需要通过某种方式获取到需要操作对象的相关信息,作为参数传递给 api-server ,从而实现对象的操作。该信息可以通过观测云中心告警通知的相关参数来获取:在调用 DataFlux Func 封装的 API 时,告警中心会将当前告警事件的详情作为参数下发,如果将需要的参数配置告警聚合条件,即可在函数平台一侧获取到需要的参数。
本例我们执行kubectl scale命令进行扩容,需要获取的参数为 deployment 的名称和当前副本数。因此在告警配置时,需要选取deployment name作为聚合条件。
注意: 若对应指标没有绑定我们需要的标签,例如这里在选取监控指标时,指标并未携带归属的deployment name,仅携带pod name,则需要多一步查询操作:基于告警下发参数进行查询,确定被操作对象(deployment)的参数。
处理告警参数
如下展示的是,观测云控制台下发到 DataFlux Func 的一个告警参数示例:
 {
  "Result": 3.8138525999999997,
  "date": 1685630030,
  "df_channels": [],
  "df_check_range_end": 1685629970,
  "df_check_range_start": 1685629910,
  "df_date_range": 60,
  "df_dimension_tags": "{\"namespace\":\"gc-dev\",\"pod_name\":\"ruoyi-system-7f49bc9cc9-dms9r\"}",
  "df_event_id": "event-2cfcdf99f7a4473f84967e88d14cecba",
  "df_event_link": "http://gc-studio.huawei.com/keyevents/monitor?time=1685629130000%2C1685630030000&tags=%7B%22df_event_id%22%3A%22event-2cfcdf99f7a4473f84967e88d14cecba%22%7D&w=wksp_9541fb20bb8a4115b596af0c689613d4",
  "df_event_reason": "\u6ee1\u8db3\u76d1\u63a7\u5668\u4e2d\u6545\u969c\u7684\u8ba4\u5b9a\u6761\u4ef6\uff0c\u4ea7\u751f\u6545\u969c\u4e8b\u4ef6",
  "df_exec_mode": "async",
  "df_issue_duration": 0,
  "df_issue_start_time": 1685630030,
  "df_language": "zh",
  "df_message": "CPU\u5229\u7528\u7387\uff1a3.8138525999999997  \n\u53d1\u751f\u65f6\u95f4\uff1a1685630030",
  "df_monitor_checker": "custom_metric",
  "df_monitor_checker_event_ref": "c240d31146e4e198990734486c27331e",
  "df_monitor_checker_id": "rul_dc585aee34c3466fa0981dd69aecf56a",
  "df_monitor_checker_name": "\u4f4d\u4e8e{{namespace}}\u4e2d\u7684Pod:{{pod_name}}\u4e1a\u52a1\u538b\u529b\u8fc7\u9ad8\uff0c\u8bf7\u5c3d\u5feb\u5904\u7406",
  "df_monitor_checker_ref": "acde60927d12cb3117f43009110dbb96",
  "df_monitor_checker_sub": "check",
  "df_monitor_checker_value": "3.8138525999999997",
  "df_monitor_id": "monitor_e4496b567ce04acb9565dc318b27412d",
  "df_monitor_name": "\u5f39\u6027\u6269\u5bb9demo\u64cd\u4f5c",
  "df_monitor_type": "custom",
  "df_source": "monitor",
  "df_status": "warning",
  "df_sub_status": "warning",
  "df_title": "\u4f4d\u4e8egc-dev\u4e2d\u7684Pod:ruoyi-system-7f49bc9cc9-dms9r\u4e1a\u52a1\u538b\u529b\u8fc7\u9ad8\uff0c\u8bf7\u5c3d\u5feb\u5904\u7406",
  "df_workspace_name": "gc\u6f14\u793a\u7a7a\u95f4",
  "df_workspace_uuid": "wksp_9541fb20bb8a4115b596af0c689613d4",
  "namespace": "gc-dev",
  "pod_name": "ruoyi-system-7f49bc9cc9-dms9r",
  "timestamp": 1685630030,
  "workspace_name": "gc\u6f14\u793a\u7a7a\u95f4",
  "workspace_uuid": "wksp_9541fb20bb8a4115b596af0c689613d4"
}
获取扩容参数
获取异常 pod 的名称
通过对上述告警参数字段进行处理,我们可以提取到本次发生异常的 pod 名称:
    #缓存告警ID
    dfEventId=kwargs.get('df_event_id')
    dfMonitorId=kwargs.get('df_monitor_id')

    #提取Pod_name和归属的ns
    eventPodName=kwargs.get('pod_name')
    eventNameSpace=kwargs.get('namespace')
获取 deployment 参数
再通过 K8s 接口查询 pod 归属的 deployment 名称及当前副本等信息,即可获取需要做操作的 deployment 参数。通过接口获取 pod 详情的代码如下:
    #获取指定pod的信息
    k8s_api_coreV1 = client.CoreV1Api()

    try:
        target_pod = k8s_api_coreV1.read_namespaced_pod(name=eventPodName, namespace=eventNameSpace)
    except ApiException as e:
        print("Exception when calling CoreV1Api->read_namespaced_pod: %s\n" % e)

    meta_OwnerRef = eval(str(target_pod.metadata.owner_references[0]))

    #获取对应kind的name并调用接口获取元数据
    k8sObjName = meta_OwnerRef.get('name')
    k8sObjKind = meta_OwnerRef.get('kind')
对于获取到的数据,需要分情况处理:
- 如果当前对象的
OwnerReferences.kind为 deployment,则可以直接获取 deployname; - 但多数情况下,K8s 对象经历过多次升级或回滚后,Owner 信息会变为对应的 ReplicaSet,这时就需要使用 Replicaset 再做一次查询,从而获取到
deployment name。示例如下:
    deployName = ""

    #获取API入口
    query_api = client.AppsV1Api()

    if  k8sObjKind =="ReplicaSet" :
        try:
            replicaset = query_api.read_namespaced_replica_set(k8sObjName, eventNameSpace)
        except ApiException as e:
            print("Exception when calling AppsV1Api->read_namespaced_replica_set: %s\n" % e)
        replica_meta = eval(str(replicaset.metadata.owner_references[0]))
        deployName = replica_meta.get('name')

    elif k8sObjKind =="Deployment" :
        print("如类型为Deployment,则直接使用本次查询到的ObjName。")
        deployName = k8sObjName

    else:
        print("非本次处理对象,退出。")
        return
获取到deployment name后,查询当前副本数,并检查能否继续执行扩容操作:
    #获取Deployment当前副本数

    target_deployment = query_api.read_namespaced_deployment(deployName, eventNameSpace)
    cur_replicas = target_deployment.spec.replicas
    #检查当前副本数是否可以继续执行扩容
    if cur_replicas >= SCALEOUT_SOFT_UPLIMITS:
        print("当前副本数:",cur_replicas,"\n当前设置软上限:",SCALEOUT_SOFT_UPLIMITS,"\n无法继续扩容,请人工处理!")
        sendCustomEventScaleFailed("warning",cur_replicas)
        return
若检查通过,则封装 K8s 数据包并执行扩容:
    #检查通过,开始封装扩容数据并执行扩容操作
    body_patch = {
                    'api_version': 'apps/v1',
                    'kind': 'Deployment',
                    'metadata':{
                        'name': deployName,
                        'namespace': eventNameSpace
                    },
                    'spec':{'replicas': cur_replicas+1}
    }
    # 下发配置更改
    update_deployment(query_api,deployName,eventNameSpace,body_patch)

    return("Resource scale out Good!\n")
配置告警通知对象
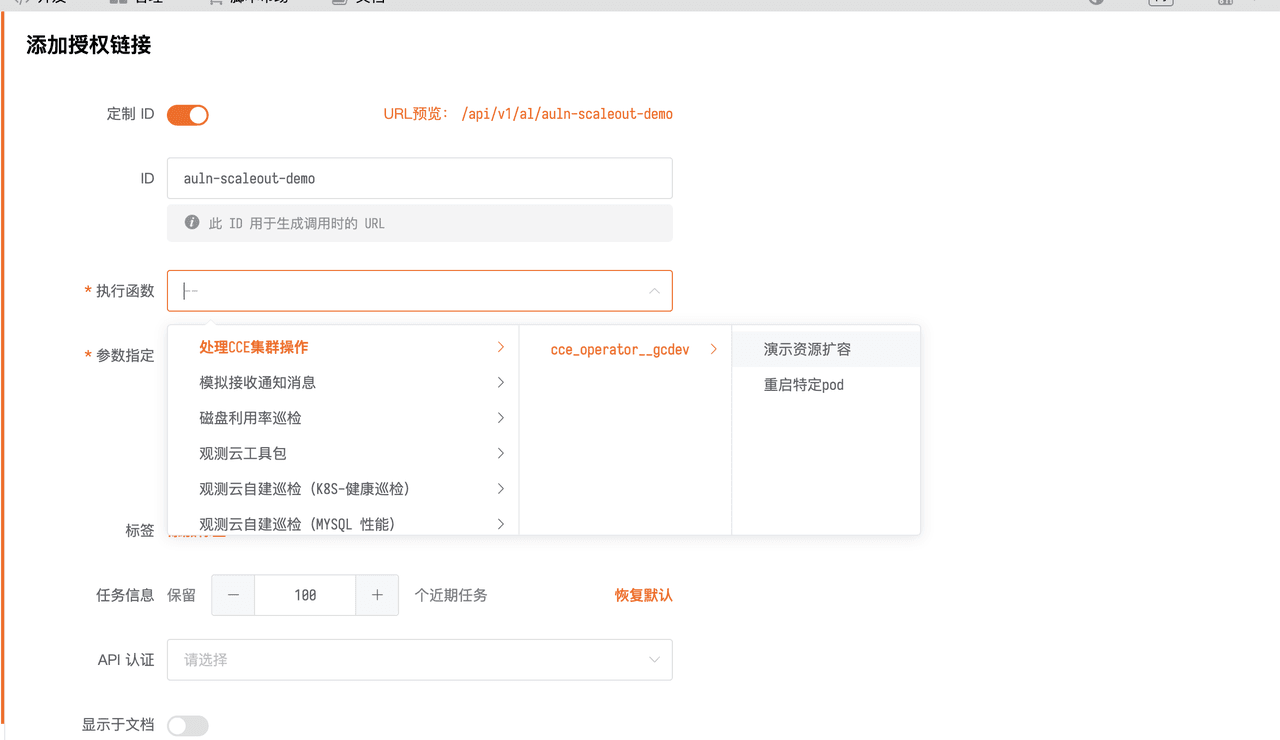
完成处理逻辑的编写后,需要进入「DataFlux Func」-「管理」-「授权链接」中,创建新的授权链接,并复制 API 地址:
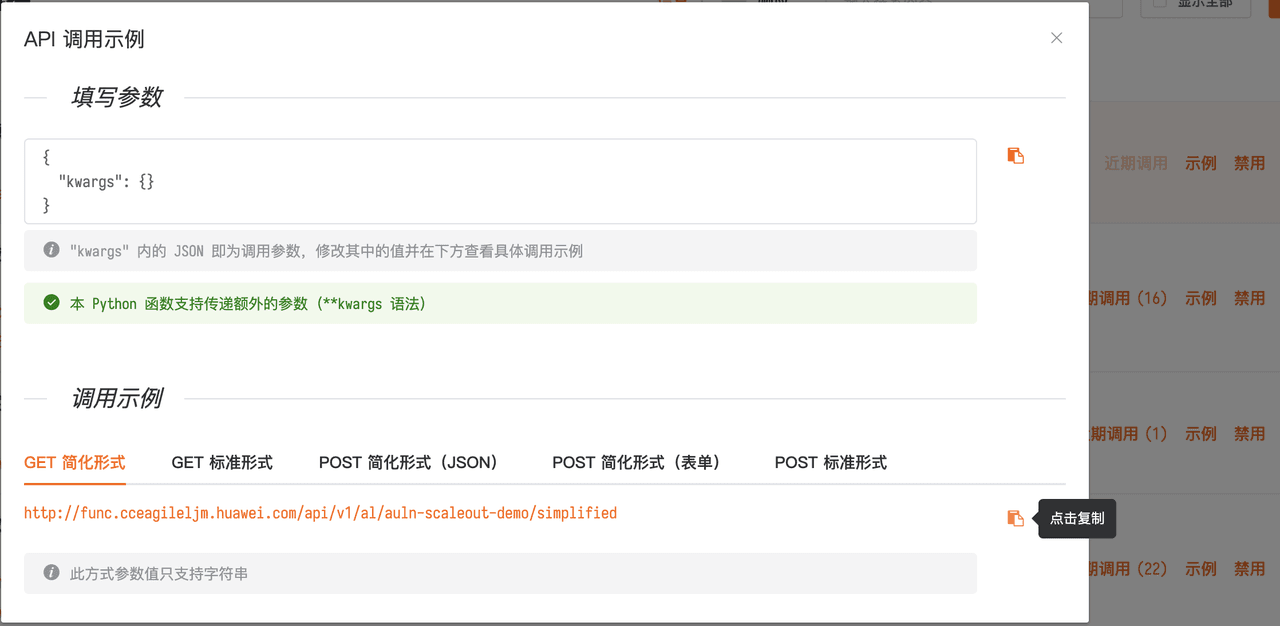
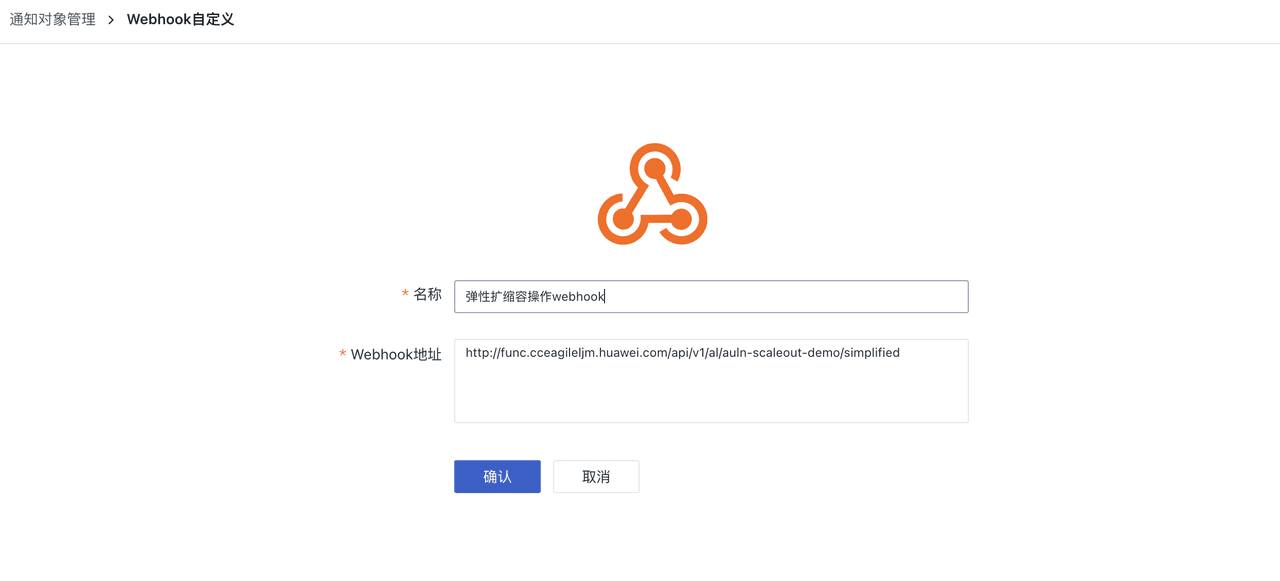
在「控制台」-「监控」-「通知对象管理」中,新建一个 Webhook 类型的通知对象,并将上面复制的 API 地址保存到 Webhook 栏:
配置观测云告警
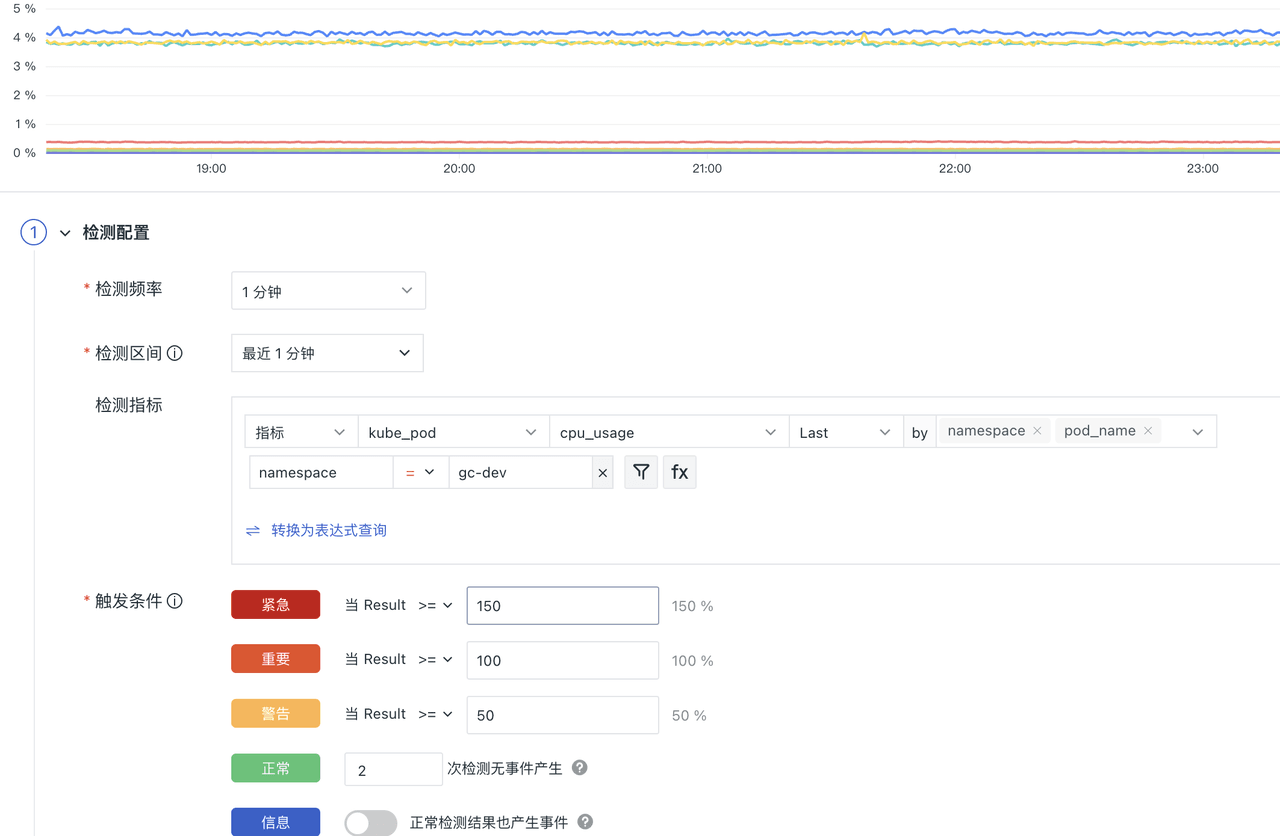
在进行故障模拟前,需要为目标应用容器设置监控指标阈值,在故障注入时触发对应的告警通知。打开「控制台」-「监控」-「新建监控器」,选取对应的指标项,配置告警阈值:
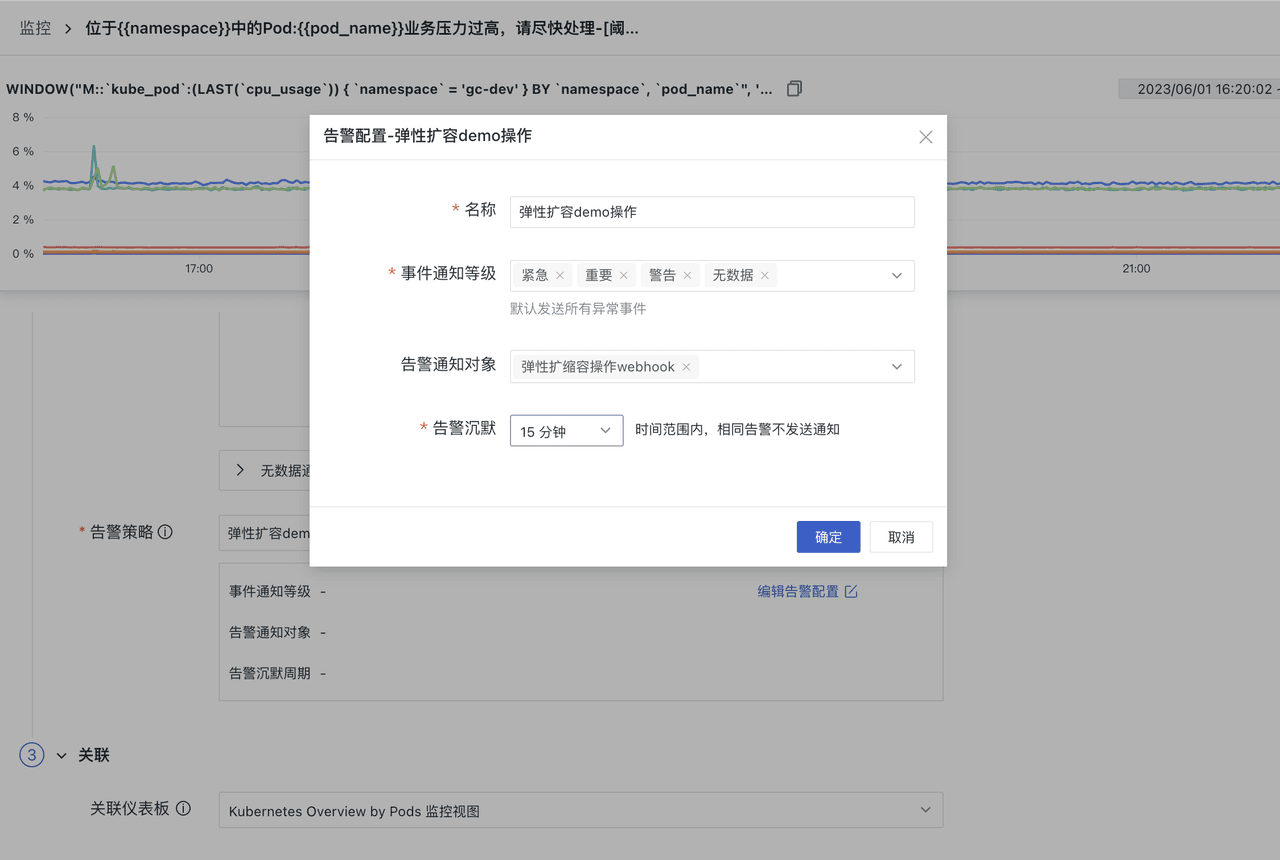
在告警通知栏,选择上一步创建的告警通知对象,点击「确定」并「保存」:
效果展示
由于没有压测环境,本例使用脚本占用前端负载均衡计算资源的方式,模拟高并发条件下需要进行系统扩容的场景。
执行故障注入
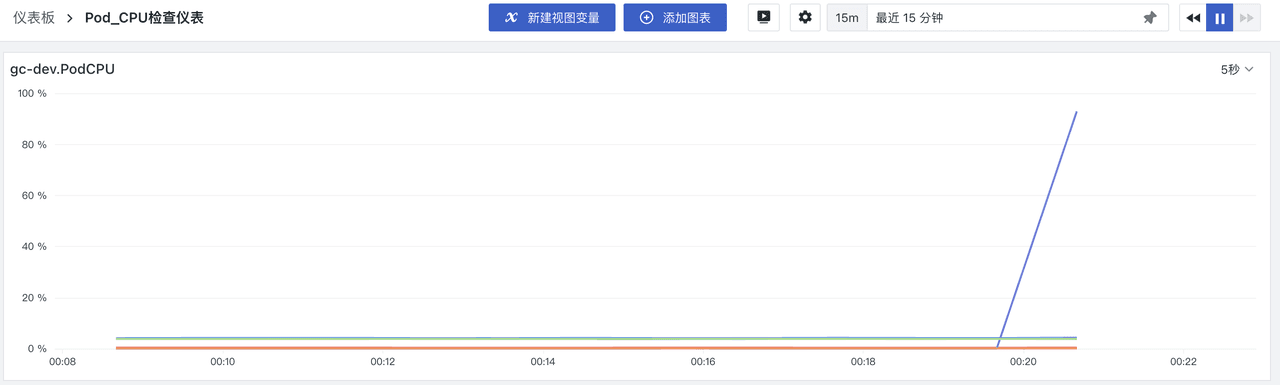
示例脚本的效果是使目标应用容器的 CPU 占用率升高:
[root@dns01-dev gc]$ vi cpu.sh
[root@dns01-dev gc]$ cat cpu.sh
#! /bin/sh
# filename killcpu.sh
if [ $# -ne 1 ] ; then
  echo "USAGE: $0 <CPUs>|stop"
  exit 1;
fi

stop()
{
while read LINE
  do
    kill -9 $LINE
    echo "kill $LINE sucessfull"
  done < pid.txt
cat /dev/null > pid.txt
}

start()
{
  echo "u want to cpus is: "$1
  for i in `seq $1`
do
  echo -ne "
i=0;
while true
do
i=i+1;
done" | /bin/sh &
  pid_array[$i]=$! ;
done

for i in "${pid_array[@]}"; do
  echo 'pid is: ' $i ';';
  echo $i >> pid.txt
done
}

case $1 in
  stop)
    stop
  ;;
  *)
  start $1
;;
esac
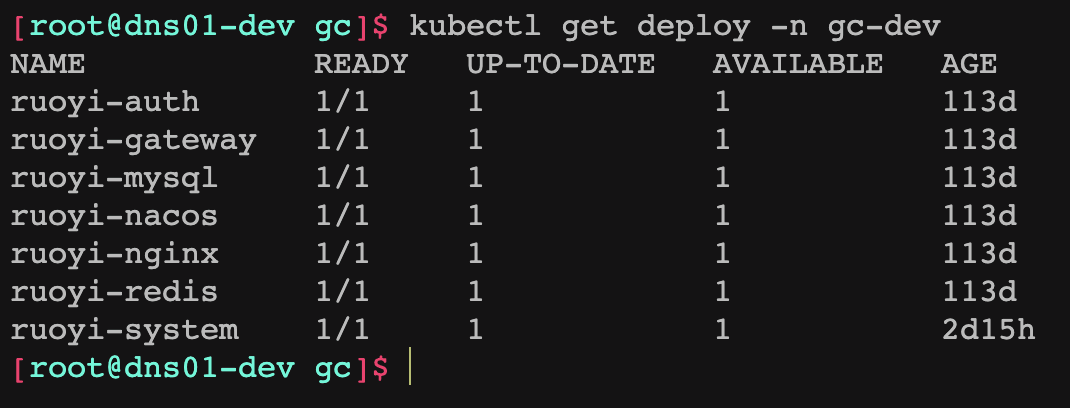
- 首先,检查当前环境 deployment 的副本数量以及 pod 列表,可以看到每个 deployment 的副本均为 1:
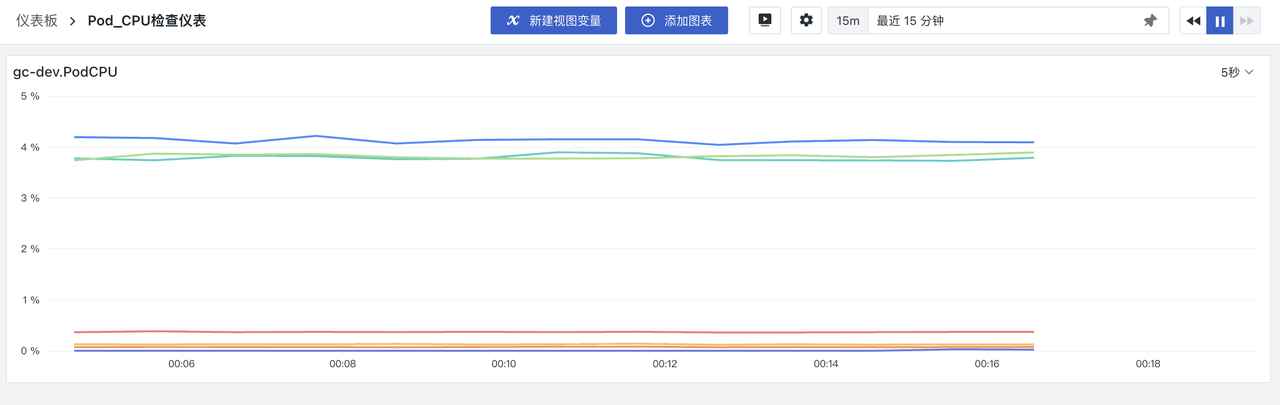
- 其次,检查当前各 pod 指标运行情况,指标均正常:
- 然后,将上面列出的
cpu.h脚本拷贝到ruoyi-nginx容器,赋权并执行脚本:
[root@dns01-dev gc]$ kubectl get deploy -n gc-dev
NAME            READY   UP-TO-DATE   AVAILABLE   AGE
ruoyi-auth      1/1     1            1           113d
ruoyi-gateway   1/1     1            1           113d
ruoyi-mysql     1/1     1            1           113d
ruoyi-nacos     1/1     1            1           113d
ruoyi-nginx     1/1     1            1           113d
ruoyi-redis     1/1     1            1           113d
ruoyi-system    1/1     1            1           2d15h
[root@dns01-dev gc]$ ls
1  cpu.sh  gc-func  gc_func_svcacc.yaml  gc-launcher  mock_cpu.sh  note.txt  stp1_nfssc  stp2_openesb  stp5_td  stp6_redis
[root@dns01-dev gc]$ kubectl get po -n gc-dev
NAME                             READY   STATUS    RESTARTS   AGE
ruoyi-auth-6475544879-pvx4r      2/2     Running   0          109d
ruoyi-gateway-7f46976bb5-g2qtf   2/2     Running   0          61d
ruoyi-mysql-6c48f4f47b-sbqpv     1/1     Running   0          113d
ruoyi-nacos-667ff88589-769rk     1/1     Running   0          113d
ruoyi-nginx-d44f6c5ff-8jphj      1/1     Running   0          2d22h
ruoyi-redis-594b4d99dd-vjl6v     1/1     Running   0          113d
ruoyi-system-7f49bc9cc9-dms9r    2/2     Running   0          2d14h
[root@dns01-dev gc]$ kubectl cp -n gc-dev cpu.sh ruoyi-nginx-d44f6c5ff-8jphj:/home
[root@dns01-dev gc]$ kubectl exec -it -n gc-dev ruoyi-nginx-d44f6c5ff-8jphj -- /bin/bash
root@ruoyi-nginx-d44f6c5ff-8jphj:/home/ruoyi/projects/ruoyi-ui# cd /home
root@ruoyi-nginx-d44f6c5ff-8jphj:/home# chmod +x cpu.sh
root@ruoyi-nginx-d44f6c5ff-8jphj:/home# ls -l
total 8
-rwxr-xr-x 1 root root  521 Jun  1 16:14 cpu.sh
drwxr-xr-x 1 root root 4096 May  4 07:48 ruoyi
root@ruoyi-nginx-d44f6c5ff-8jphj:/home# ./cpu.sh 1
u want to cpus is: 1
./cpu.sh: 29: pid_array[1]=54: not found
./cpu.sh: 32: Bad substitution
root@ruoyi-nginx-d44f6c5ff-8jphj:/home# /bin/sh: 1: -ne: not found

root@ruoyi-nginx-d44f6c5ff-8jphj:/home#
检查注入效果
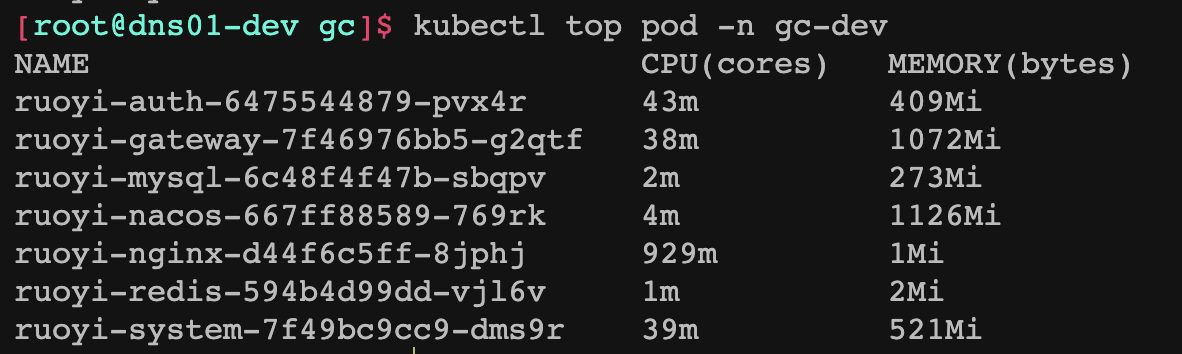
通过kubectl命令和观测云仪表板,检查脚本执行效果:
检查告警触发
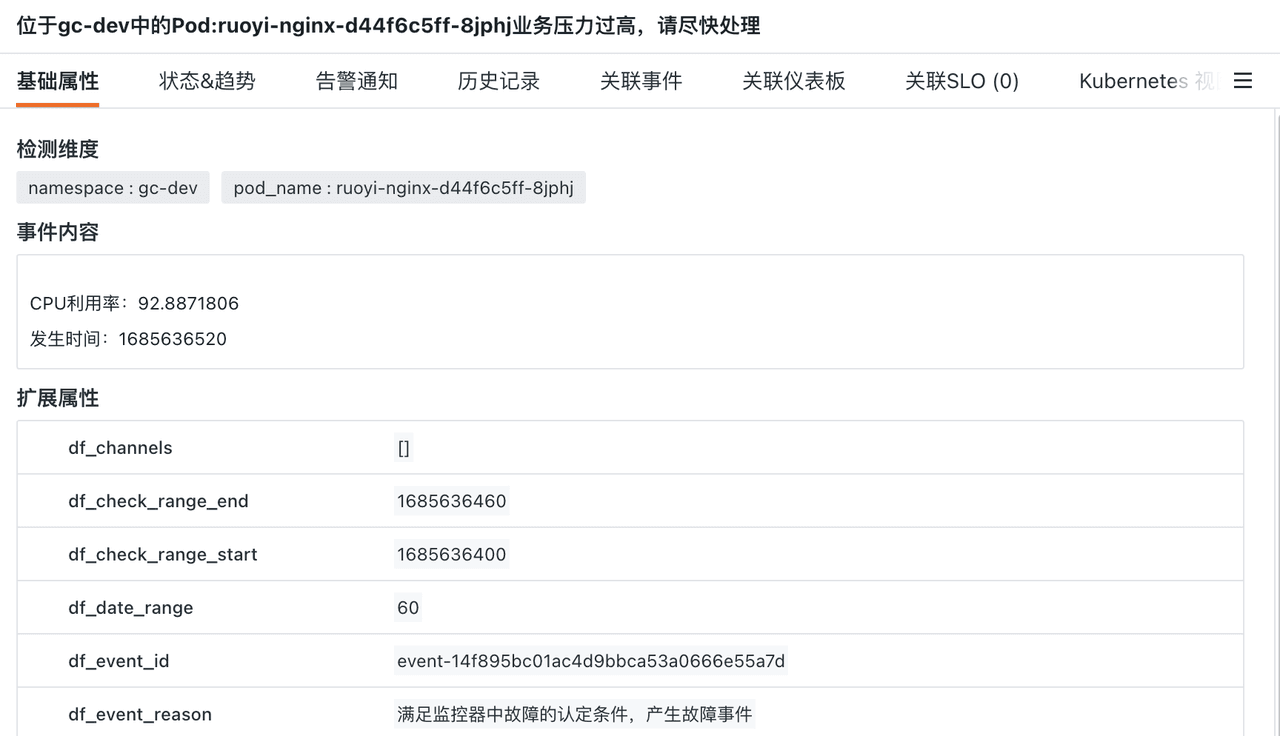
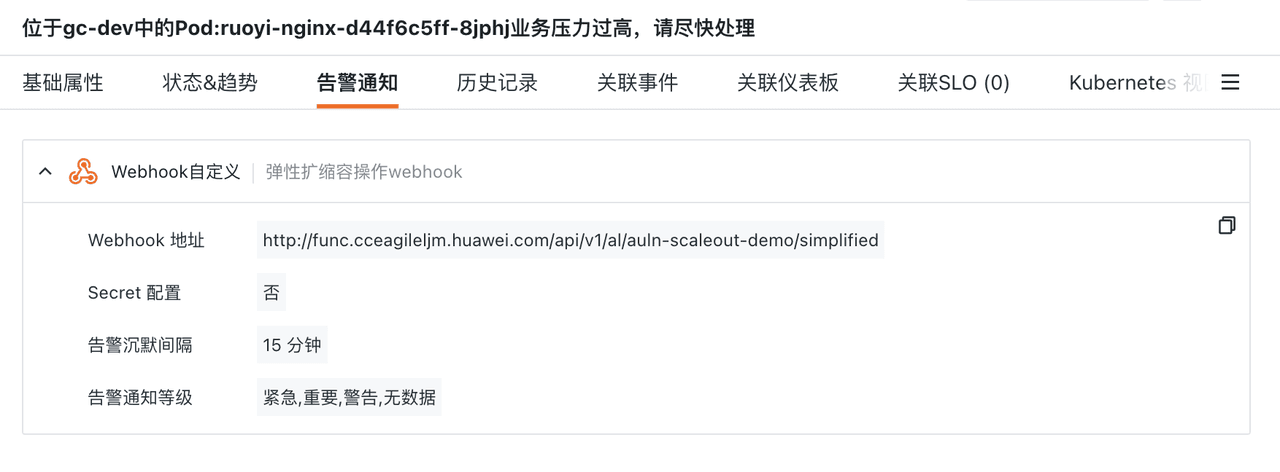
检查「控制台」-「事件」,查看告警触发情况。点击具体的告警条目打开告警详情,点击「告警通知」,查看是否成功调用了 Webhook 通知对象。若看到告警未发送,点击「通知对象」可以看到未发送的具体原因:
检查脚本执行结果
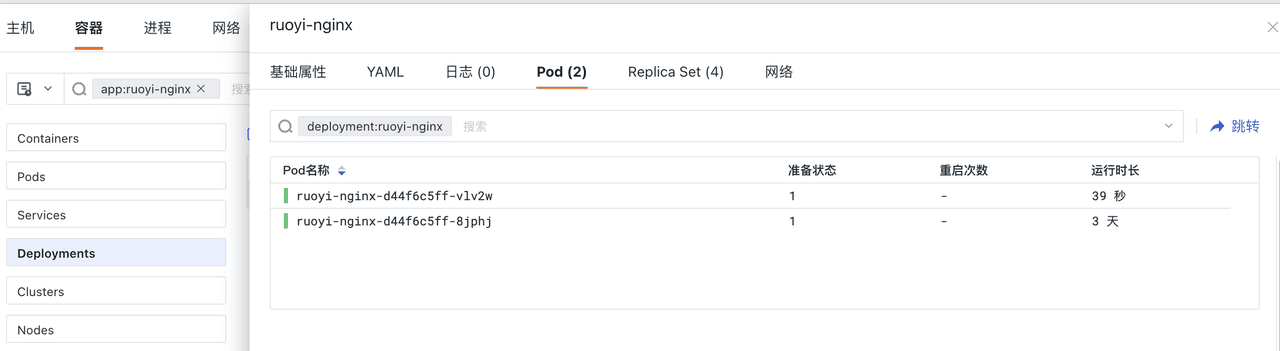
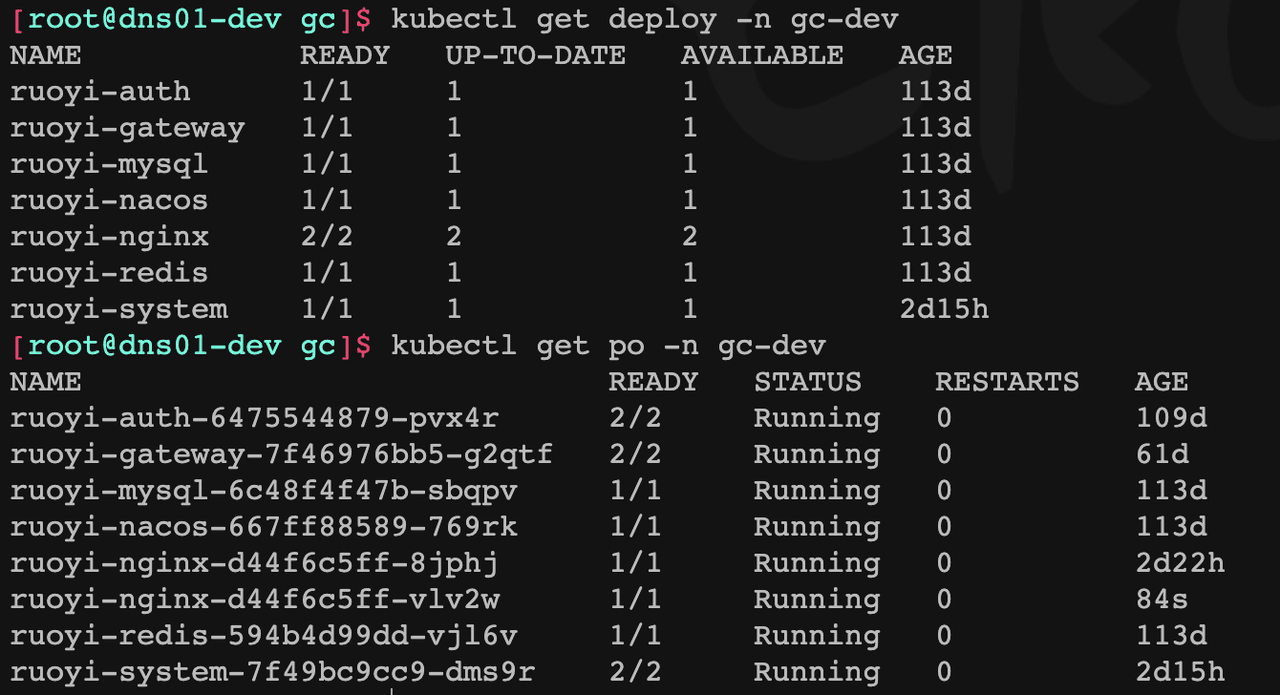
如下两种方式均可看到本次扩容已完成:
- 若告警通知已发送至 DataFlux Func ,通过「控制台」-「基础设施」-「容器」-「Pod」可以看到当前副本数。
- 或者,可以通过集群的
Kubectl命令检查当前副本数。
至此,弹性扩容的用例演示结束。
总结
通过应用观测云函数开发平台,用户可以衍生出各种对被测系统的查询、管理等操作,为系统管理工作提供了极大的便利性和灵活性,也为拓宽观测云使用场景提供了技术基础,是非常好用的一款工具。
附:完整示例代码
from kubernetes import client, config
from kubernetes.client.rest import ApiException

import pytz
import re
import datetime
import json
import requests

#ApiToken
#这里填入您自己的API_TOKEN
API_TOKEN = "xxxxxx"

#这里填写目标集群的API-Server地址
KUBE_API_HOSTS= "https://x.x.x.x:5443"

'''
Demo演示:
基于监控数据扩容资源
'''
#用于执行kubectl patch的操作
def update_deployment(api,deploy_name,ns,patch_detail):
    # patch the deployment
    try:
        resp = api.patch_namespaced_deployment(name=deploy_name, namespace=ns, body=patch_detail)
    except ApiException as e:
        print("Exception when calling api->read_namespaced_pod: %s\n" % e)

    print("\n[INFO] deployment's replicas count updated.\n")
    print("%s\t%s\t\t\t%s\t%s" % ("NAMESPACE", "NAME", "REVISION", "REPLICAS"))
    print(
        "%s\t\t%s\t%s\t\t%s\n"
        % (
            resp.metadata.namespace,
            resp.metadata.name,
            resp.metadata.generation,
            resp.spec.replicas,
        )
    )

## 扩容副本数软上限设置,表示最大扩容到5副本
SCALEOUT_SOFT_UPLIMITS=5

@DFF.API('演示资源扩容')
def cceDeployScaleOps(**kwargs):

    #格式化打印告警参数,用于解析需要的信息
    rawEventMsg = json.dumps(kwargs,indent=2,ensure_ascii=False)
    print("告警发送内容:\n",rawEventMsg)

    #缓存告警ID
    dfEventId=kwargs.get('df_event_id')
    dfMonitorId=kwargs.get('df_monitor_id')

    #提取Pod_name和归属的ns
    eventPodName=kwargs.get('pod_name')
    eventNameSpace=kwargs.get('namespace')

    #配置客户端连接
    configuration = client.Configuration()
    setattr(configuration, 'verify_ssl', False)
    client.Configuration.set_default(configuration)
    configuration.host = KUBE_API_HOSTS                    #ApiHost
    configuration.verify_ssl = False
    configuration.debug = True
    configuration.api_key = {"authorization": "Bearer " + API_TOKEN}
    client.Configuration.set_default(configuration)


    #获取指定pod的信息
    k8s_api_coreV1 = client.CoreV1Api()

    try:
        target_pod = k8s_api_coreV1.read_namespaced_pod(name=eventPodName, namespace=eventNameSpace)
    except ApiException as e:
        print("Exception when calling CoreV1Api->read_namespaced_pod: %s\n" % e)

    meta_OwnerRef = eval(str(target_pod.metadata.owner_references[0]))

    #获取对应kind的name并调用接口获取元数据
    k8sObjName = meta_OwnerRef.get('name')
    k8sObjKind = meta_OwnerRef.get('kind')

    deployName = ""

    #获取API入口
    query_api = client.AppsV1Api()

    if  k8sObjKind =="ReplicaSet" :
        try:
            replicaset = query_api.read_namespaced_replica_set(k8sObjName, eventNameSpace)
        except ApiException as e:
            print("Exception when calling AppsV1Api->read_namespaced_replica_set: %s\n" % e)
        replica_meta = eval(str(replicaset.metadata.owner_references[0]))
        deployName = replica_meta.get('name')

    elif k8sObjKind =="Deployment" :
        print("如类型为Deployment,则直接使用本次查询到的ObjName。")
        deployName = k8sObjName

    else:
        print("非本次处理对象,退出。")
        return

    #获取Deployment当前副本数

    target_deployment = query_api.read_namespaced_deployment(deployName, eventNameSpace)
    cur_replicas = target_deployment.spec.replicas

    #检查当前副本数是否可以继续执行扩容
    if cur_replicas >= SCALEOUT_SOFT_UPLIMITS:
        print("当前副本数:",cur_replicas,"\n当前设置软上限:",SCALEOUT_SOFT_UPLIMITS,"\n无法继续扩容,请人工处理!")
        sendCustomEventScaleFailed("warning",cur_replicas)
        return

    #检查通过,开始封装扩容数据并执行扩容操作
    body_patch = {
                    'api_version': 'apps/v1',
                    'kind': 'Deployment',
                    'metadata':{
                        'name': deployName,
                        'namespace': eventNameSpace
                    },
                    'spec':{'replicas': cur_replicas+1}
    }
    # 下发配置更改
    update_deployment(query_api,deployName,eventNameSpace,body_patch)

    return("Resource scale out Good!\n")